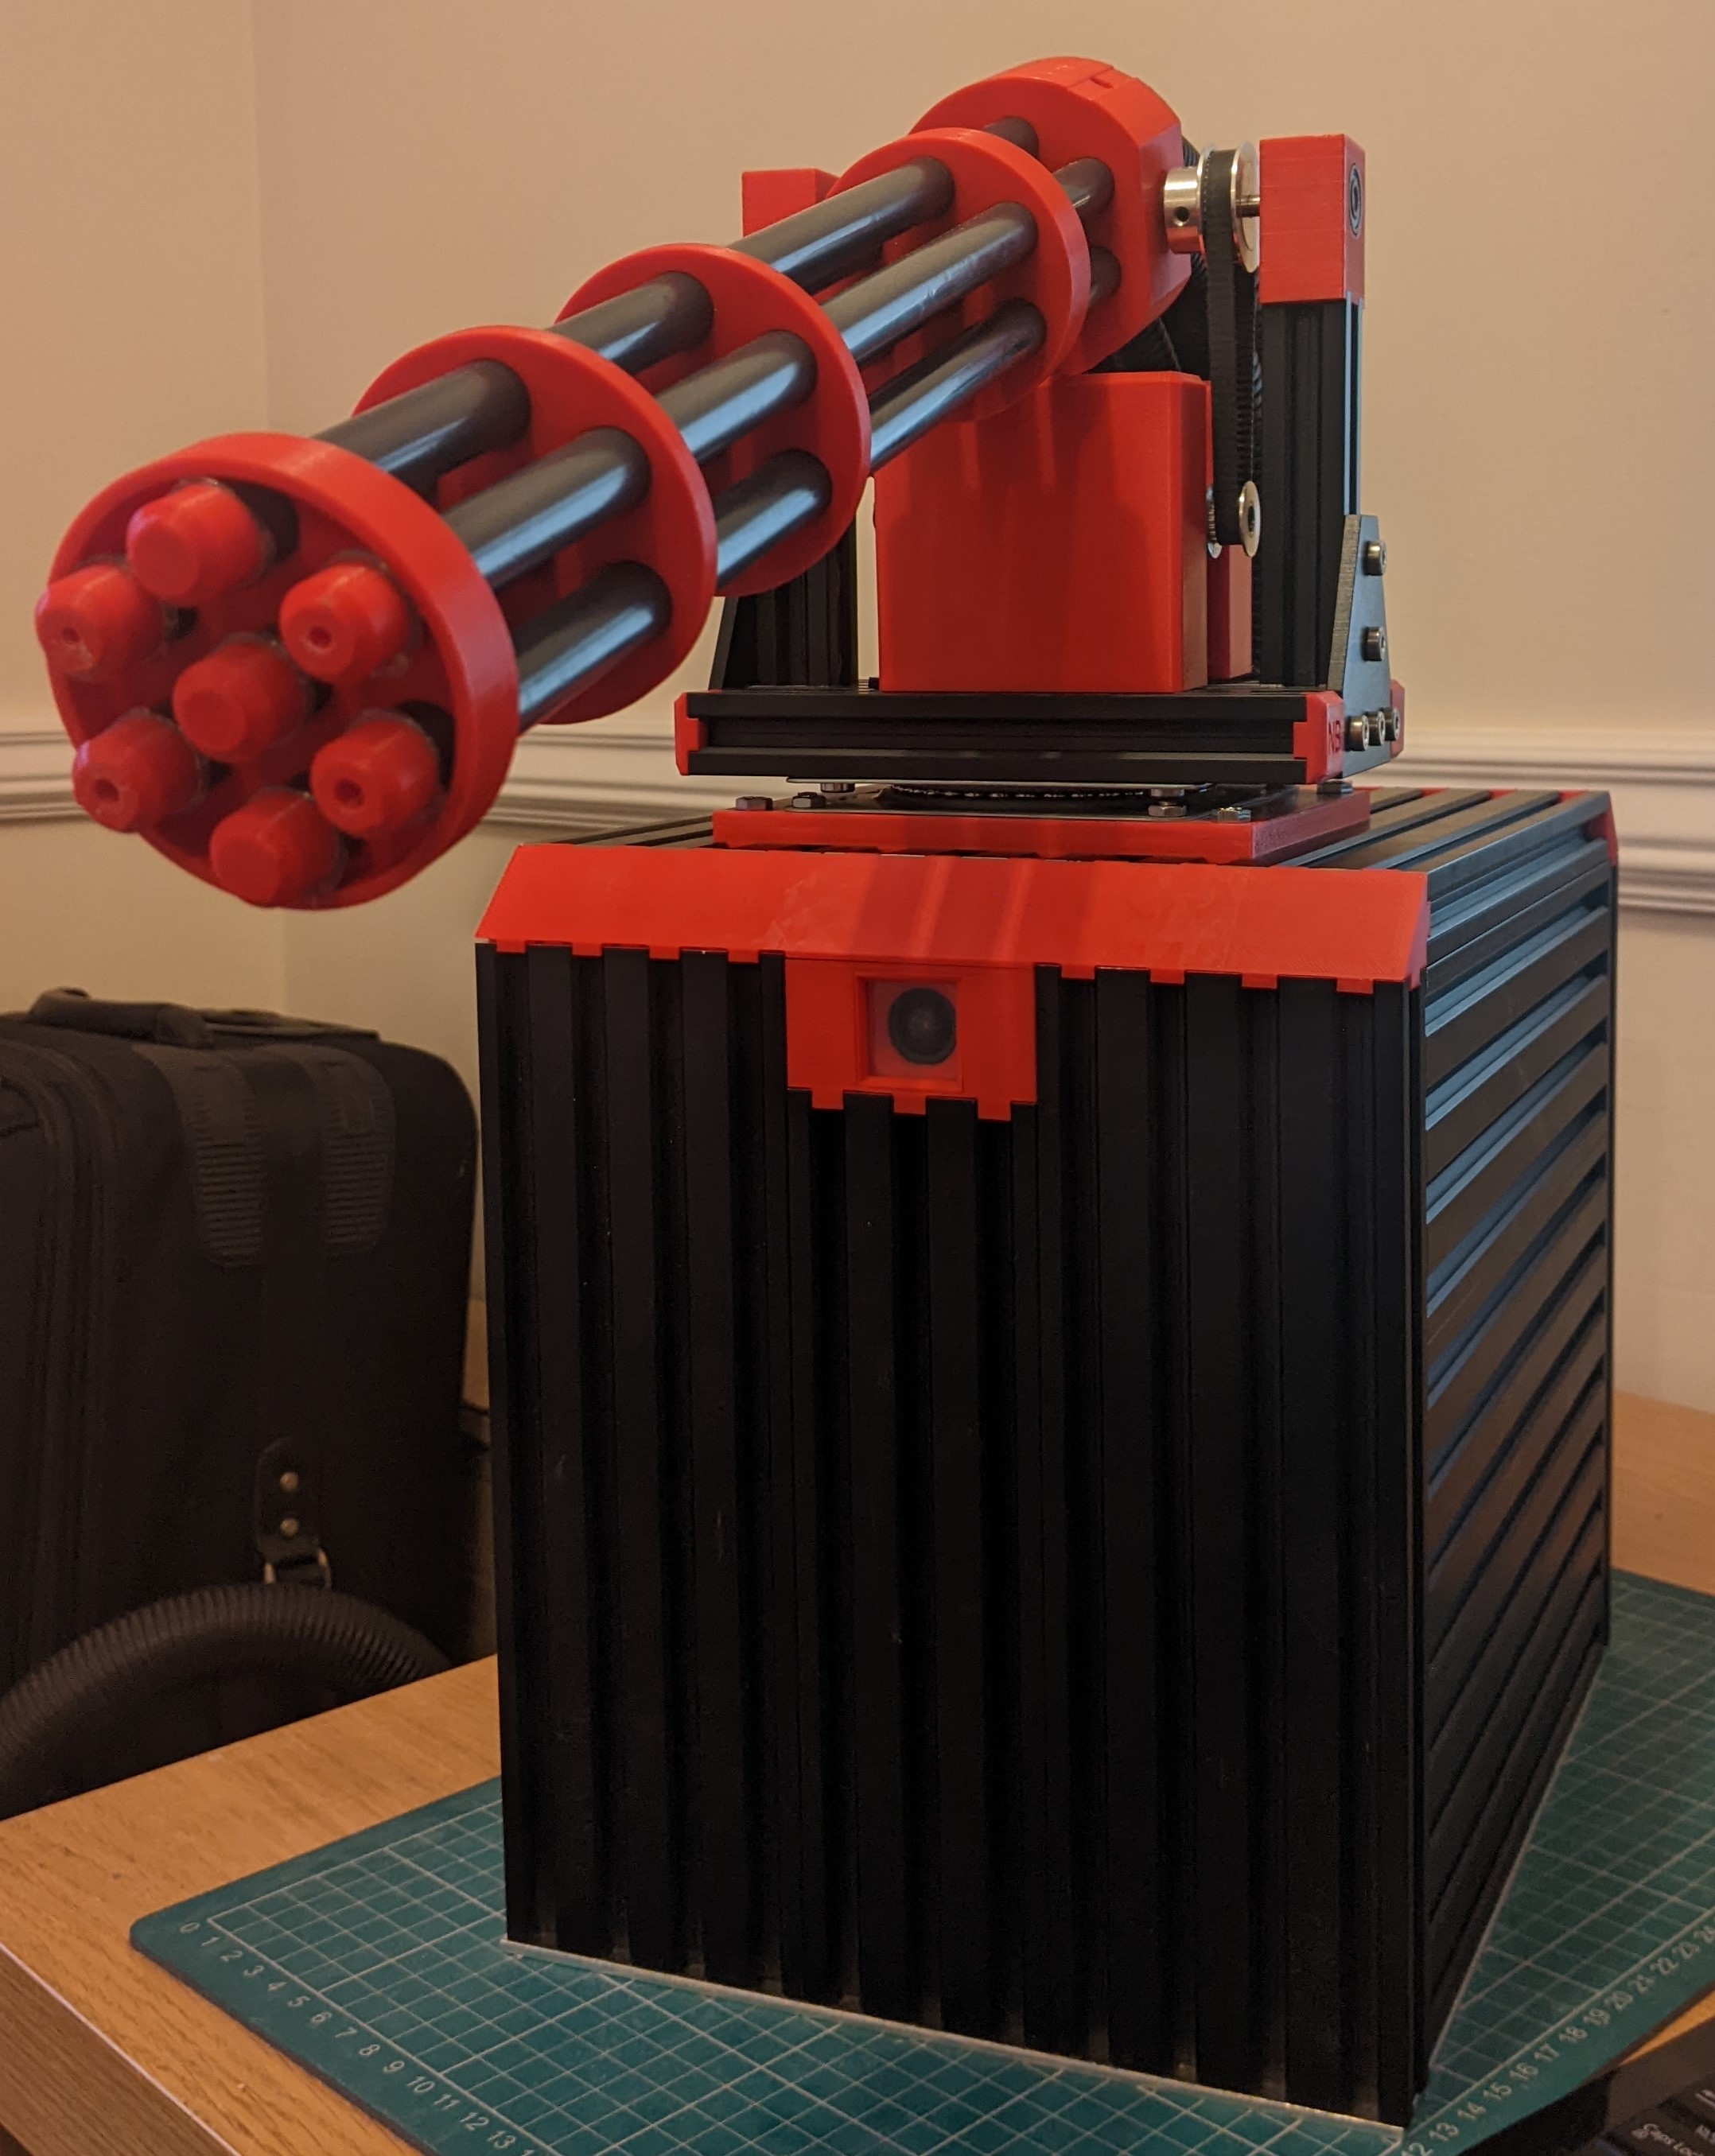
Water Auto Turret
Welcome to the home of the Water Auto Turret! This project was borne out of the desire to use one of my excellent Khadas VIM3 SBC for something other than crypto currency mining and to provide an excellent (if I do say so myself!) toy for my daughter and her friends during the summer months. The motivation to finish it came from the 1st Khadas Community Competition - thank you Khadas! I’ve used the VIM3 to create large crypto mining clusters so I knew they were high performance, well supported and well documented SBCs. One specific feature that I hadn’t used before was the Neural Processing Unit (NPU) and so this project was born to give a real world application to test this feature out.

The intention when designing and building this water turret was to minimise the custom design aspects and use off the shelf components (both hardware and software) as far as possible. This didn’t always work out as there ended up being lots of custom 3D printed items, a custom PCB, custom extrusions and software however all of these aspects were made significantly easier due to the following companies I sourced parts and software from - I highly recommend them for any similar projects and work!:
- Khadas - OEM of the VIM3, fan, heatsink and the OS08A10 camera used in the project. They also provide excellent support for their products with full 3D CAD models available making the design of 3D printed parts that incorporate them a breeze, great documentation, great supporting software from operating systems to code to access the NPU (including via Python!) and a great forum with lots of community support - Khadas
- Ooznest - source for all the aluminum extrusions, brackets and motors used in this project. Their fast, excellent and very accurate cut to size and tapping service for the extrusions made the core mechanical aspects of this project really easy to put together - Ooznest
- Prusa - source for my Prusa i3 MK3S+ 3D printer and the Prusament filament used to 3D print all parts in this project. The accuracy from this printer allowed repeatable production of friction fit parts making assembly of the Water Auto Turret significantly easier - Prusa
- Accu - source for all the fixings used in this project - this might not sound like the most exciting aspect but being able to easily and quickly (next day) get fixings of the lengths needed in stainless steel without massive minimum order quantities allowed rapid progress to be made without adding additional constraints / time into the design process. My order history on their site attests to their usefulness as ive bought everything from M1.4 screws to the M12 coach bolts used in making my daughters monkey bars (can be seen in the background of the demo video!) - Accu
Heres a short video of the Water Auto Turret in action during its testing phase
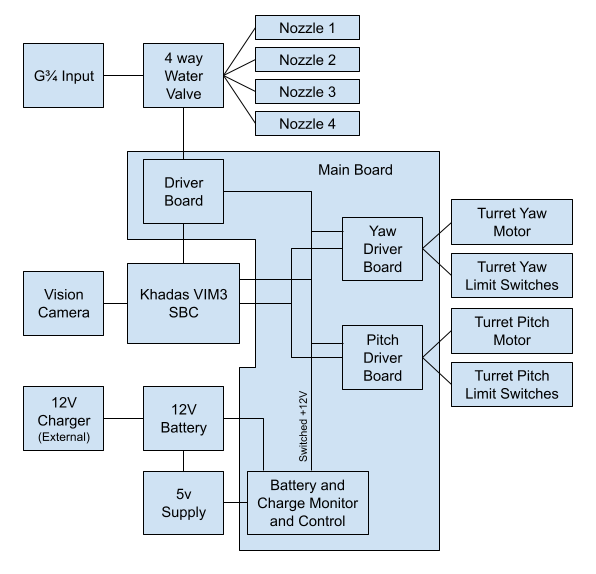
The Water Auto Turret has been built from black anodised extrusions, Lipstick Red Prusament PLA for all 3D printed parts and stainless steel fixings because I like the combination of these colours but this is obviously left up to the individual to pick the colour scheme and combinations. The block diagram for the Water Auto Turret can be found below.

Controller
The heart of the system is the Khadas VIM3 SBC it provides the overall controller interfacing to a camera to provide the vision inputs, running the software for target identification and tracking (see the Software Description) and interfacing to a custom Main Board that provides:
- Control for pitch and yaw motors
- Control for water flow via solenoid valves
- Power control with battery charging identification and voltage monitoring
The camera used in the system is a Khadas OS08A10 8MP HDR Camera. This plugs into the VIM3 via the MIPI-CSI port. The camera is housed in a custom 3D printed enclosure {02 Camera Enclosure} (the design of which was made way easier by the use of the Khadas provided CAD model of the camera!) that joins onto the main electronics enclosure that houses the VIM3 and Main Board.
Main Board
The Main Board (see the Controller PCB) for circuit diagrams, PCB layouts and firmware for the embedded microcontroller) for the system is designed as a daughter board for the VIM3 that plugs on via the 40 pin GPIO header and has fixing holes aligned to the VIM3 ones allowing both boards to be screwed together into the custom 3D printed electronics enclosure. Between the Main Board and VIM3 is a 3D printed heatsink cover to help direct airflow and a set of 3D printed spacers to keep the two boards correctly spaced when screwed in. A securing slot is also provided for the VIM3 wifi antenna to hold it in place in the enclosure. The {00 Electronics Enclosure Base} and {01 Electronics Enclosure Lid} have been designed to minimise the chances of water ingress whilst at the same time allowing all the required connections and airflow. All connections are via the bottom on the enclosure and are via grommets to minimise open areas. Air flow is via the front face of the enclosure with a plenum chamber (with water drain holes) to prevent direct water access. The air from this chamber is directed into the side of the VIM3 heatsink where it is pulled across the heatsink via the VIM3 heatsink fan. Exhaust air is pulled out of the enclosure via a fan in the bottom. A grommet strip is used to provide a seal between the lid and base and the interface to the camera housing has a lip preventing water entering via this direction as well.
The Main Board provides control of the pitch and yaw motors for the Water Auto Turret Barrel through the use of TMC5160 motion controllers. These simplify overall system and software design by just allowing target positions to be sent to the controllers (post calibration) with the TMC5160 taking care of the complicated motor and position control. To further simplify the design TMC5160 Breakout Boards have been used that incorporate the motor drive MOSFETs and all passives needed on a small form factor PCB that simply plugs into the Main Board via pin headers. These boards interface to the VIM3 via the SPI interface (GPIO pins 16 => CLK, 35 => SDO, 37 => SDI), with VIM3 GPIO pins used as chip select (CS) lines (GPIO pins 22 => Yaw Motor CS, 23 => Pitch Motor CS). The TMC5160 motion controller boards also incorporate lines for the use of limit switches. Two are used for each of the pitch and yaw motors to allow for homing. The motion controllers are capable of switch free homing but requires the motors to be running at reasonable speeds and to hit physical limits for sensing neither of which are present in this system.
Water Control
Control of the water flow is provided via a standard 4 way normally closed solenoid valve. This valve has a standard G3/4 threaded input and 4 10mm outlets, each of which is individually controlled via a 12v solenoid. These solenoids are in turn controlled via a DRV8806 mounted on the Main Board that provides the required drivers for the solenoids and interfaces to the VIM3 via a simple clock and latch serial interface (GPIO pins 29 => SDI, 31 => SCLK, 32 => Latch, 33 => Reset (not used but wired in case useful). 4 of the 6 barrels on the overall Water Auto Turret barrel can therefore be used to squirt water at targets. Different size nozzles have been provided as 3D printed parts to allow for different ranges and volumes of water. These nozzle sizes can be configured for the water pressure present and the desired ranges. The number of nozzles used simultaneously can also affect the distance depending on the available water pressure. These nozzles are designed to slot inside the individual barrels and have been hot glued in place which provides a good balance between being able to change and a decent water seal. The solenoid valve has been chosen to be able to cope with mains water pressure and in the system I use has a standard push fit hosepipe fitting screwed onto the G3/4 thread to allow easy connection and disconnection from the water supply.
Power
The entire system is powered via a 12v sealed lead acid battery. This provides a water safe way of providing the power required in a portable manner. No charging control circuit is contained in the system but a connector is provided to enable a standard 12v sealed lead acid battery charger to be connected to the system. A fan is provided (in a 3D printed housing to prevent water damage) to ensure ventilation of the Water Auto Turret base when the battery is charging. The Main Board monitors for this charging power input and also monitors the battery voltage to ensure that the battery is not over discharged. If either of these conditions are detected then the power to the VIM3, motor and solenoid controllers is removed and only restored once both these conditions are removed. This is achieved via a latching 12v relay to reduce power consumption. These control aspects are provided via a small PIC microcontroller that also provides indication (via LED on the power and water inlet 3D printed part) if either of these conditions are encountered. The firmware for this microcontroller can be found in the firmware subfolder of the PCB folder. The C source code is fully commented and is fairly simple so no explanation is provided here.
Project Status
The Water Auto Turret is currently fully functional and capable of identifying, tracking and shooting targets (i.e. children!) with water. In work is an improvement to the frame rate of the tracking algorithm and improvement to accuracy of water shooting - especially in the more extreme left and right arcs of fire.
Build Guide
A complete description, build guide and bill of materials can be found in this repository so should be relatively straightforward for anyone that wants to replicate the project. Any questions then please just ask - I am more than willing to help.
Build Guide and Descriptions:
- VIM3 Setup
- Software Description
- 3D Printed Parts
- Mechanical Assembly
- Electronics Assembly
- Full Bill of Maerials and Equipment Breakdown Strucutre
3D Models
A complete interactive 3D Model for the Water Auto Turret can be found here and an export of all the 3D components in both Fusion360 and step file formats can be found here 3D Models